
To operate a Vivitar drone effectively, start by familiarizing yourself with its components and controls. Understanding the basics of drone operation will allow you to navigate and capture stunning aerial footage safely and efficiently. This guide will provide you with detailed instructions and insights tailored for beginners, ensuring that you can make the most of your Vivitar drone experience.
Understanding Your Vivitar Drone

Before taking to the skies, it is crucial to understand the various components of your Vivitar drone. The primary parts include the camera, propellers, battery, and remote controller. The camera quality can significantly impact the quality of footage you capture, so take a moment to familiarize yourself with its specifications and settings. The propellers are essential for flight; ensure they are clean and free from debris. The battery, which powers your drone, should be fully charged and properly installed to avoid any interruptions during your flight.
Additionally, reading the user manual is a vital step in understanding your specific model’s features and functions. Different Vivitar drones may have unique capabilities, such as altitude hold, GPS positioning, or automated flight modes. Familiarizing yourself with these features will enhance your flying experience and allow you to utilize your drone to its full potential.
Pre-Flight Checklist

A thorough pre-flight checklist is essential for ensuring a safe and successful drone flight. Begin by confirming that the drone is fully charged. It’s advisable to charge the battery to its maximum capacity before each flight to extend flight time and performance. Next, check the propellers for any signs of damage, such as cracks or chips, as these can affect stability and safety during flight. Ensure that the propellers are securely attached to the drone, as loose propellers can lead to catastrophic failures mid-flight.
Additionally, ensure that your flying location is suitable. Look for open areas with minimal interference from buildings, trees, or power lines to avoid obstacles that could jeopardize your drone’s safety. Checking the weather conditions is equally important; avoid windy or rainy days, which can affect flight performance.
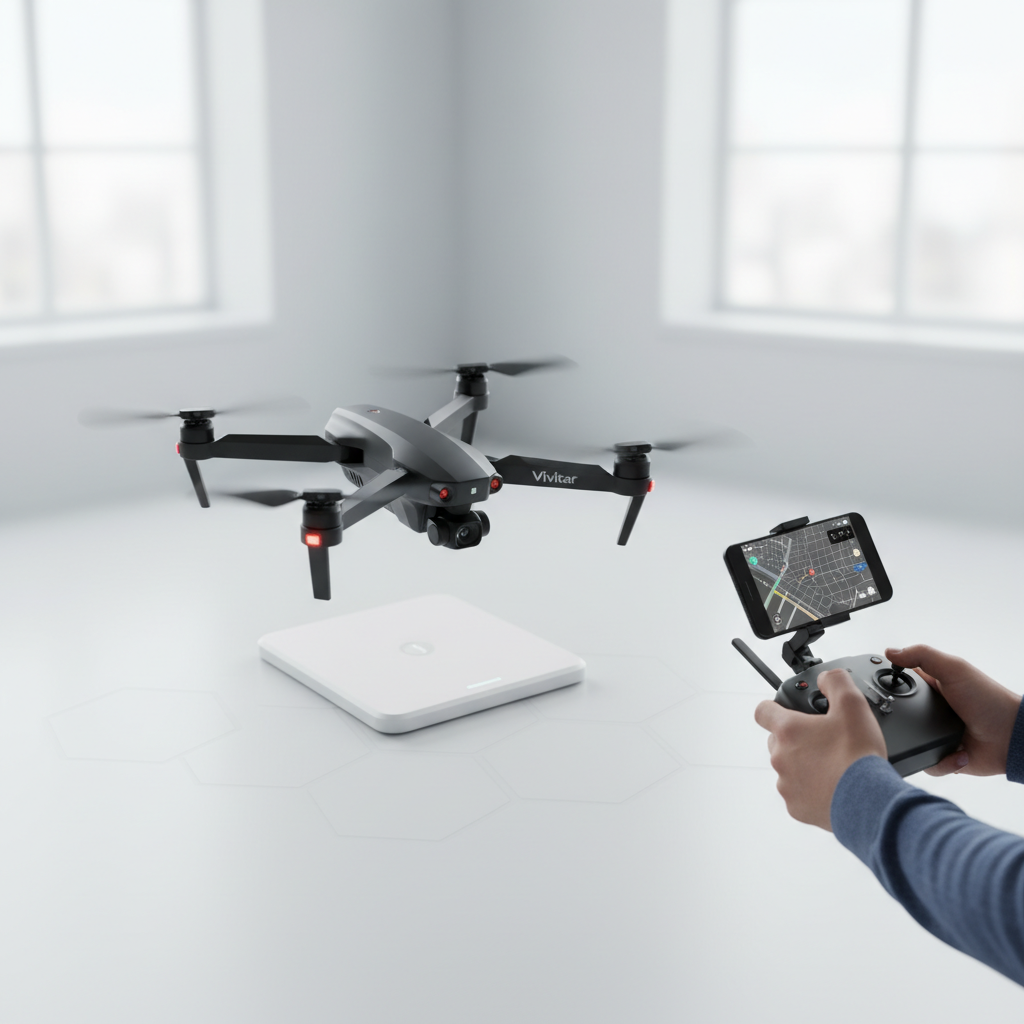
Connecting Your Controller
To connect your Vivitar drone with your remote controller, start by powering on both devices. Ensure that your remote controller batteries are charged to prevent any connectivity issues. Once powered on, locate the Wi-Fi settings on your smartphone or tablet. Connect to the drone’s designated Wi-Fi network, which is typically outlined in the user manual. This connection allows you to access a live video feed from the drone’s camera, providing you with real-time visuals during your flight.
Make sure to adjust the settings on your smartphone or tablet for optimal performance, such as disabling background applications that may consume bandwidth. A stable connection is crucial for effective control and feedback while navigating your drone.
Basic Flight Controls
Learning the basic flight controls is paramount for any beginner drone pilot. Familiarize yourself with the throttle, yaw, pitch, and roll controls. The throttle controls altitude; pushing the throttle stick up will increase elevation, while pulling it down will decrease it. Yaw controls the rotation of the drone around its vertical axis, allowing you to turn left or right. Pitch refers to the forward or backward tilt of the drone, while roll controls the sideways tilt.
Start practicing basic maneuvers in a safe, open area. Begin with takeoff and landing, which are fundamental skills for any pilot. Once you feel comfortable, practice hovering in place and executing simple movements. Gradually increase your confidence by incorporating more complex maneuvers such as figure eights or circular patterns. This practice will help you develop a better understanding of your drone’s responsiveness and handling.
Capturing Aerial Footage
One of the most exciting aspects of flying a Vivitar drone is the ability to capture breathtaking aerial footage. Before you take off, set up your camera settings for optimal video quality based on your environment. Consider factors such as lighting, angle, and resolution. For instance, shooting during golden hour—shortly after sunrise or before sunset—can yield stunning visuals due to the soft, diffused light.
Experiment with different flight paths to achieve dynamic shots. For instance, try flying in a circular pattern around a subject to create a 360-degree view or ascend vertically while filming to capture a dramatic perspective. Utilizing features such as automated flight paths, if available on your model, can also help in achieving professional-looking footage without the complexities of manual control.
Troubleshooting Common Issues
Even experienced drone pilots encounter issues from time to time. Familiarizing yourself with common problems such as loss of signal, battery issues, or camera malfunctions is essential for a smooth flying experience. If you experience a loss of signal, calmly maneuver the drone back into range, as most models are equipped with a fail-safe return-to-home feature.
Always ensure your battery is fully charged and monitor its usage during flights. If you notice a significant decrease in flight time, it may be time for a battery replacement. For camera-related issues, such as blurry footage, check the lens for dirt or smudges and make necessary adjustments to the camera settings. Refer to your user manual for troubleshooting tips specific to your Vivitar drone model, as this can provide valuable insights tailored to your device.
Safety Guidelines
Safety should always be your top priority while flying a drone. Always fly in open areas away from people, animals, and obstacles. This reduces the risk of accidents and ensures that you have ample space to maneuver. It’s also crucial to be aware of local regulations regarding drone usage. Many jurisdictions require drone registration and may have specific flying restrictions, particularly in urban areas or near airports.
Stay informed about airspace regulations and respect no-fly zones. Additionally, consider the privacy of others; avoid flying over private property without permission. Practicing responsible drone operation fosters a positive community image for drone enthusiasts and ensures the longevity of your flying privileges.
In conclusion, operating a Vivitar drone is an exciting endeavor that can yield stunning results. By following these guidelines and practicing your skills, you’ll be well on your way to becoming a proficient drone pilot. Understanding your drone’s components, conducting thorough pre-flight checks, mastering controls, and adhering to safety regulations will enhance your flying experience. Get your drone ready and start exploring the skies!
Frequently Asked Questions
What are the basic steps to fly a Vivitar drone for beginners?
To fly a Vivitar drone, start by fully charging the battery and installing it into the drone. Next, turn on the remote controller and the drone, ensuring they are paired. Familiarize yourself with the controls; typically, the left stick controls altitude and rotation, while the right stick manages forward, backward, and lateral movements. Practice flying in an open area while keeping the drone within your line of sight to build your confidence.
How do I connect my Vivitar drone to my smartphone?
To connect your Vivitar drone to your smartphone, first download the corresponding app from the App Store or Google Play. Once installed, turn on the drone and the Wi-Fi feature on your phone. Open the app and select the drone’s Wi-Fi network from the available connections. Once connected, you can access various features, including live video feed and camera settings directly through the app, enhancing your flying experience.
Why is my Vivitar drone not responding to the remote control?
If your Vivitar drone is unresponsive to the remote control, several issues might be at play. Ensure that both the drone and remote are charged and powered on. Check if they are properly paired; sometimes, re-pairing may be necessary. Additionally, ensure you are within the effective control range and that there are no obstructions or interference from other electronic devices. If problems persist, refer to the user manual for troubleshooting steps.
What is the best way to maintain my Vivitar drone for longevity?
To maintain your Vivitar drone, regularly check for any physical damage and clean the propellers to ensure optimal performance. Store the drone in a dry, cool place to prevent battery degradation, and always follow charging guidelines to prolong battery life. Additionally, keep the software updated through the app to ensure you have the latest features and fixes, which can enhance your flying experience and drone longevity.
Which Vivitar drone models are best for photography and videography?
The Vivitar Drones with built-in cameras, such as the Vivitar VTI Phantom or the Vivitar VTI Drone, are particularly suited for photography and videography. These models typically feature HD cameras that can capture high-quality images and videos, along with stabilization features that help reduce shaky footage. Look for models with adjustable camera angles and FPV (first-person view) capabilities for a more immersive experience.
References
- https://en.wikipedia.org/wiki/Quadcopter
- https://www.faa.gov/uas/getting_started
- https://www.nasa.gov/feature/what-is-a-drone
- https://www.dronepilotgroundschool.com/drone-pilot-training/
- https://www.techrepublic.com/article/how-to-fly-a-drone-10-tips-for-beginners/
- https://www.dji.com/education/drone-flying-tips
- https://www.nationalgeographic.com/science/article/drone-technology-explained
- https://www.ama-assn.org/delivering-care/public-health/drone-technology-and-public-health
- https://www.southampton.ac.uk/engineering/research/drones.page
